
When it comes to indulgent desserts, few can rival the rich and velvety goodness of a chocolate mousse cake. This decadent treat combines the lightness of chocolate mousse with the comforting texture of a cake, creating a heavenly experience for every chocolate lover. Perfect for any special occasion or simply a sweet weeknight treat, this recipe showcases the delightful balance between a moist cake and a luscious mousse. Get ready to impress your family and friends with a dessert that not only tastes incredible but also looks stunning on any dining table.
What Makes This Recipe So Effective
This chocolate mousse cake recipe stands out for its perfect blend of simplicity and elegance. While it may seem sophisticated, the preparation is straightforward even for novice bakers. With just a few basic ingredients that you might already have in your kitchen, you can whip up this delightful cake without breaking the bank. Furthermore, the recipe can be adjusted easily, allowing you to customize it to your taste. Whether it’s a birthday party, an anniversary celebration, or just an ordinary day that needs a sweet touch, this cake is sure to impress.
A Brief Overview of How This Comes Together
Creating this chocolate mousse cake involves two main components: the cake and the mousse. The cake base is made from a luscious batter featuring cocoa powder, flour, and sugar. After baking, it cools completely, allowing the flavors to deepen. Meanwhile, a rich chocolate mousse is crafted from melted chocolate, egg whites, and whipped cream, which gives it that airy texture. The two come together beautifully when the mousse is spread on top of the cooled cake, resulting in a truly delectable dessert that’s ready for any gathering. It’s easy as pie—or should we say cake!
Ingredients
- 1 cup all-purpose flour
- 1/2 cup unsweetened cocoa powder
- 1 teaspoon baking powder
- 1/2 teaspoon baking soda
- 1/4 teaspoon salt
- 1/2 cup unsalted butter, softened
- 1 cup granulated sugar
- 2 large eggs
- 1 teaspoon vanilla extract
- 1/2 cup buttermilk
- 8 oz semi-sweet chocolate, chopped
- 2 tablespoons unsalted butter
- 3 large eggs, separated
- 1/4 cup granulated sugar
- 1 cup heavy cream
- 1 teaspoon vanilla extract
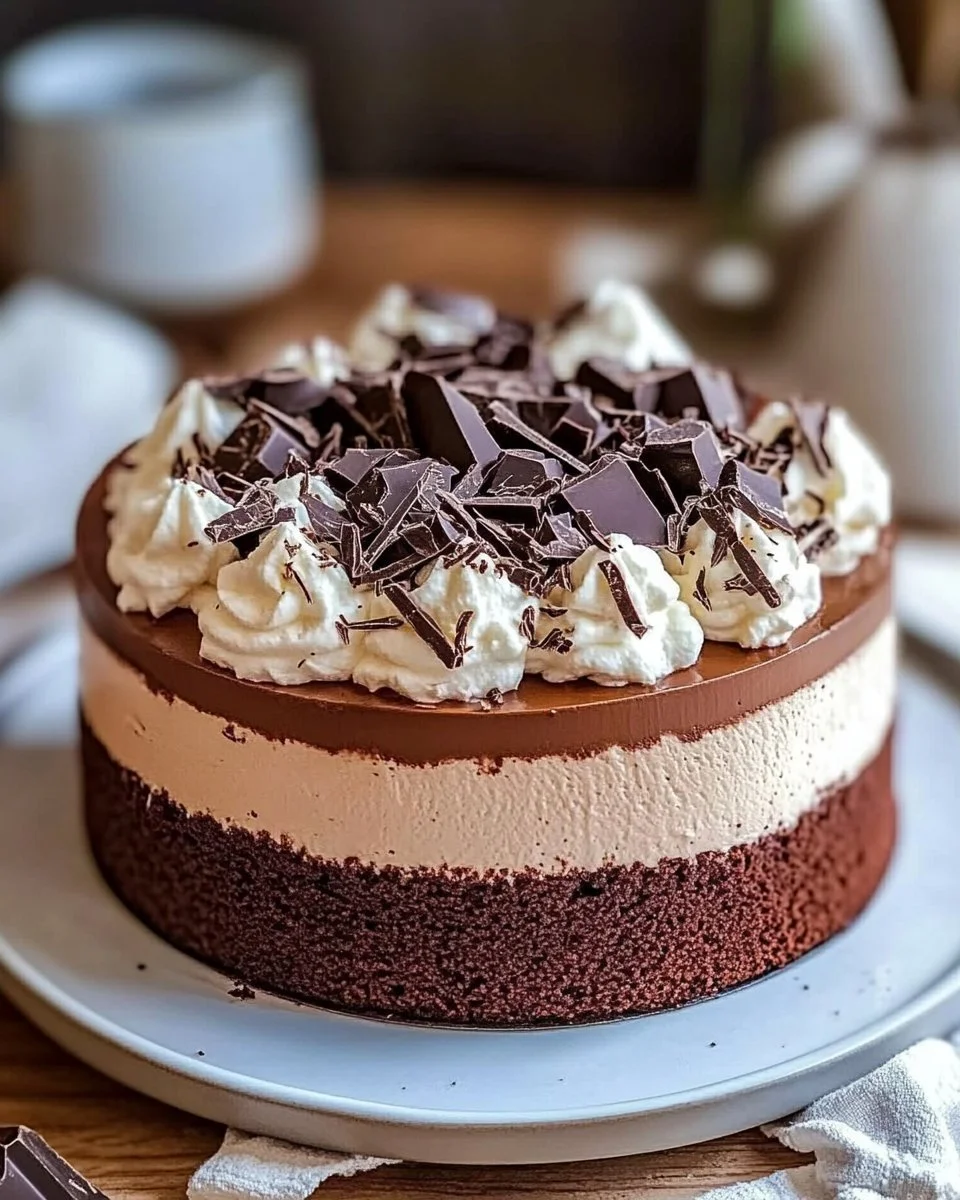
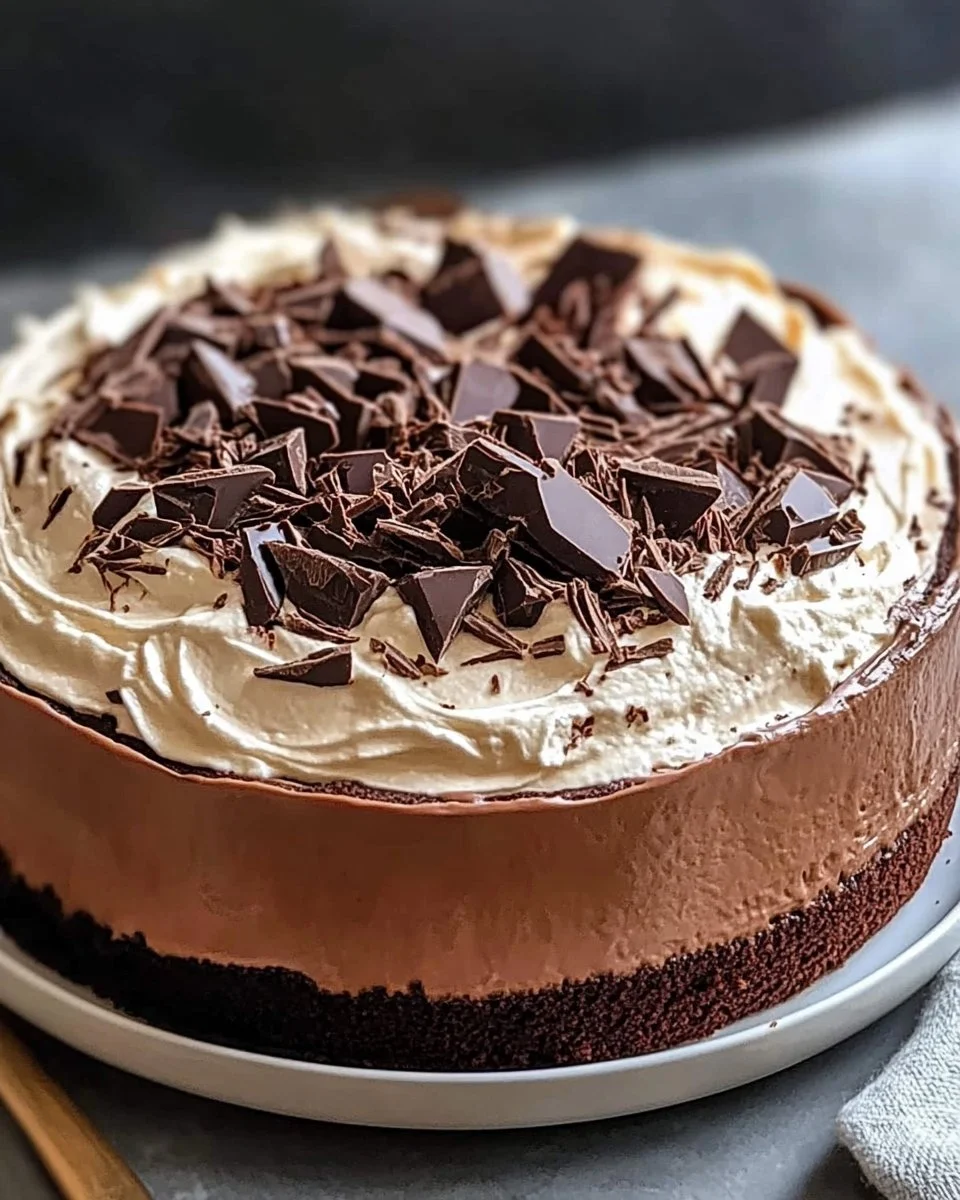
- Whipped cream (for garnish)
- Chocolate shavings (for garnish)
When it comes to baking, quality ingredients make all the difference. Here are a few notes on the key components of this chocolate mousse cake:
- Unsweetened Cocoa Powder: This provides the rich chocolate flavor. Opt for high-quality cocoa powder for the best results.
- Butter: Using unsalted butter allows you to control the saltiness of the cake.
- Buttermilk: This adds moisture and a slight tang, which balances the sweetness of the cake.
- Semi-Sweet Chocolate: Favors the mousse with a rich flavor while still being sweet enough to please everyone.
How to Make This Decadent Cake in Just a Few Steps
To embark on your chocolate mousse cake adventure, follow these organized steps for a seamless baking experience:
STEP 1: MAKE THE CAKE.
Start by preheating your oven to 350°F (175°C). Prepare an 8-inch round cake pan by greasing and flouring it. In a medium bowl, whisk together the all-purpose flour, cocoa powder, baking powder, baking soda, and salt. This dry mixture helps create a well-flavored cake.
In a large mixing bowl, cream together the softened butter and granulated sugar. Use a hand mixer or stand mixer, beating until the mixture is light and fluffy, which usually takes around 3-5 minutes. Next, add the eggs one at a time, beating thoroughly after each addition. Add in the vanilla extract as well.
Now it’s time to bring the ingredients together! Gradually mix in the dry ingredients to the butter mixture, alternating with the buttermilk. Begin with the dry ingredients and end with them; this helps incorporate them better. Pour the well-combined batter into the prepared cake pan and bake in the preheated oven for about 25-30 minutes. To check for doneness, insert a toothpick in the center; if it comes out clean, the cake is ready.
Once baked, remove the cake from the oven and let it cool completely in the pan on a wire rack.
STEP 2: PREPARE THE MOUSSE.
While the cake cools, you can focus on making the luscious mousse. Begin by melting the chopped semi-sweet chocolate and the 2 tablespoons of butter together. A convenient method is to use a double boiler, where you simmer water in a pot, placing a heatproof bowl with the chocolate and butter on top. Stir until smooth, then remove from heat and allow it to cool slightly.
In a separate bowl, beat the separated egg whites until soft peaks form. Gradually add the 1/4 cup of sugar, which will help stabilize the peaks. In another bowl, incorporate the egg yolks into the cooled chocolate mixture, stirring gently to combine. Carefully fold in the beaten egg whites, making sure not to deflate them, followed by the whipped cream. This folding technique is key to maintaining the mousse’s airy texture.
Beautiful Presentation Suggestions
After the cake has completely cooled, it’s time to bring everything together. Spread the velvety mousse generously over the top of the cake. For a delightful finish, garnish with dollops of whipped cream and sprinkle chocolate shavings for that restaurant-style presentation.
Smart Ways to Serve This Dessert
Your chocolate mousse cake can shine as the centerpiece of any celebration. Consider serving it with a scoop of vanilla ice cream for added creaminess or fresh berries to introduce a fruity contrast. For special occasions like birthdays or anniversaries, pair it with a sweet dessert wine or a cup of rich coffee. Not only does it look exquisite, but it also tastes even better when shared with loved ones at gatherings or cozy family dinners.
Keeping Your Cake Fresh: Storage Tips
If you happen to have leftovers (which is often not the case with such a delicious dessert), storing your cake is essential for preserving that fresh taste. Cover the chocolate mousse cake with plastic wrap or store it in an airtight container and keep it in the refrigerator. It should stay fresh for about 3-4 days.
If you need to store it longer, consider freezing individual slices for up to three months. Wrap each slice in plastic wrap and then place them in a freezer-safe container. To enjoy, simply thaw in the fridge or at room temperature for about 30-60 minutes before serving.
Essential Tips for a Perfect Result
Every cook can use a few helpful tips to navigate the kitchen with grace:
- Be sure to let the cake cool completely before adding the mousse. A warm cake can cause the mousse to melt and lose its texture.
- Whip the cream to soft peaks before folding it into the mousse mixture; this gives the mousse a lightness that’s simply irresistible.
- Use high-quality cocoa powder and chocolate for a deeper flavor, as inferior products can lead to a bland result.
- Pay attention to not overmix the mousse after adding the whipped cream, as this can deflate it.
Delicious Variations to Consider
If you feel like getting creative with your chocolate mousse cake, here are a few delicious variations to try:
- Add a hint of coffee: Mixing in a tablespoon of instant coffee granules into the melted chocolate can bring out the chocolate flavor even more!
- Experiment with chocolate types: Swap semi-sweet chocolate for dark or milk chocolate depending on your palate preference.
- Include some spice: Cinnamon or chili powder can add an intriguing twist to the chocolate flavor.
- Make it gluten-free: Substitute the all-purpose flour with a gluten-free flour blend, ensuring you have a version that everyone can enjoy!
Your Questions Answered
- How long does it take to prepare this cake? From start to finish, you can expect about 1.5 to 2 hours, including cooling time. Plan accordingly!
- Can I use egg substitutes in the mousse? Yes, you can use aquafaba or a commercial egg replacer for the egg whites, though results may vary slightly.
- Do I need to refrigerate the cake after making it? Yes, it’s best kept in the refrigerator due to the mousse component, which contains whipped cream and eggs.
- Is this cake make-ahead friendly? Absolutely! You can bake the cake a day ahead and prepare the mousse the day you plan to serve it.
- Can I add fruit layers to this dessert? Yes! Adding layers of fruit, such as raspberries or cherries, can elevate the flavors and add a beautiful touch.